Editing: animations, transitions, colour, audio & text
Animations, effects, & transitions
Getting to know the effects panel
To add effects to clips or add transitions between clips we need to activate 2 panels: Effects (shown on the right) and Effect Controls (Left). These panels function like this:
– Effects: this is a menu where the different preset effects can be added to the clips. Premier offers a variety of effects that are useful to know as basic. Here we will select the effect we want and drag it to the clip we want.
– Effect controls: a clip needs to be selected in order for this option to be active, then the menu will be displayed, and we will be able to control the effects in the clip. Also, here we can arrange the basics of format for the clip that all clips have as a pre-set of Premiere; these are arranged in 3 categories: 1) Motion 2) Opacity, 3) Time remapping (yellow lines)
Take some time to explore the utility (practical and creative) of the different intrinsic effects.
The green circle signals the icon ‘fx’ that is yellow this indicates that one of the intrinsic effects of the clip has been altered
Understanding transitions
Transitions are effects that determine how one clip goes into the next one, transitions can also be added to graphics and text and they are a great way to make the editing look/feel smooth and creative. Take some time to go over the basics of transitions with participants, mainly:
- Default transition
- Dip to white/black
- Cross dissolve
- Slide
- Split
Here is a video for inspiration and tips to use when thinking about transitions:
Basic effects to learn
There are a lot of effects you can create using almost any editing software, here are some great examples of effects in Premiere Pro:
Gaussian blur effect
Named after mathematician Carl Friedrich Gauss (rhymes with “grouse”), Gaussian blur is the application of a mathematical function to an image in order to blur it. Let’s see a quick tutorial for it:
Warp stabilizer
This effect can be used in clips where there are (little) movements in the camera that were not desired, like when recording with a phone, or in zoom-ins that are substantial.
- First phase: when applying this effect, the program will first make an analysis of the clip to determine what I can do.
- The Second phase is when the effect is applied, often this will result in the movement of the camera not entirely disappearing but becoming softer. In the effect control panel, we can determine the different results this effect can create on a clip. Usually, this effect will also re-configure things of the clip like scale and frame, this can also be configured in the effect controls panel.
Here is a video tutorial that explains it in depth:
Colour tint
Colour will determine the atmosphere of your video so watch this tutorial to understand how to use tint effect in Premiere!
Masks
Masks let you define a specific area in a clip that you want to blur, cover, highlight, apply effects, or colour-correct. You can create and modify differently shaped masks, like an Ellipse or a Rectangle. Masks can be also copied/pasted onto other effects, so if different clips have the same object and different effects are needed for different clips, this option might come in handy.
Multiple effects
Several effects can be applied to the same clip, however, the order of the effects (in the effect control panel) will determine the result, so in order to arrive at the desired result this needs to be taken into consideration. It is also important to know how can we change the visualization of the program monitor; we can have it in the preset: fit, which will adjust the frame of the clip to the size of the panel, or we can select the percentage that we want to see, so when working on specific areas of the clip it might come handy to be able to zoom in (left yellow circle). It’s also handy to know that when several effects are applied, the program might run slower, especially for pre-visualizing the clips. In order to avoid this you can lower the quality of the image in the pre-visualization to allow the program to run smoother. (right yellow circle)
Colour correction
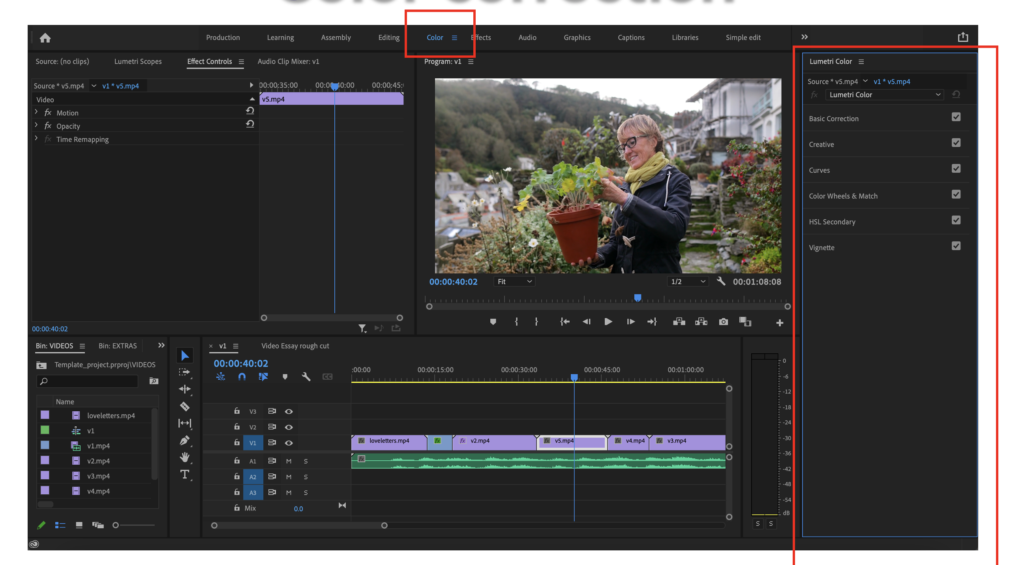
Colour panel
Let’s take some time to go over this new workspace. The main thing to know is that in this panel, clips will be automatically selected when they are showing on the program monitor and effects can be applied directly from the right panel of Lumetri color. It’s also important to mention that within this panel corrections are cumulative, this means that you can apply basic colour corrections AND creative colour, we recommend you play around with this to understand what we mean by cumulative.
Let’s go over the basics of colour correction
- Basic Correction: this is what it sounds like, basic colour correction. Premiere offers an automatic correction, this is quite a good option but since we have provided an extensive understanding of contrast, saturation, exposure, etc., you might want to do your own correction. To copy and paste a color correction to other clips we go to the effect control panel, right-click on the correction effect, select copy, then go to the other clip, and within the effect control panel, right-click, and select paste.
- Creative: the first part of creative corrections functions very similar to filters, a small display will appear in the colour panel that will allow you to have a pre-visualization of each filter in the image. To select it click on the image, to reset, go back to the filter menu and select ‘None”. The settings underneath are also worth exploring, they look quite similar to the basic correction ones, but they have different behaviors. Take some time to play with the tint wheels to understand how they function.
- Curves: this function allows us to have greater control over the image, the first option RGB Curves shows a diagonal line. You can use different keyframe markers to create the curve and manipulate it. This effect is especially useful for fixing light/white balance issues. HUE saturation curves are also super useful if there are specific colours within the clip that you need to modify.
- Colour Wheels & Match: this section is designed to have super precise control of colour and is especially useful because it has a comparative monitor option; we can select a reference clip and the clip that we are working on to compare them and make sure the colour correction in both clips match.
Here is a tutorial about colour that sums up what we mentioned and also goes a bit further
Audio repair & effects
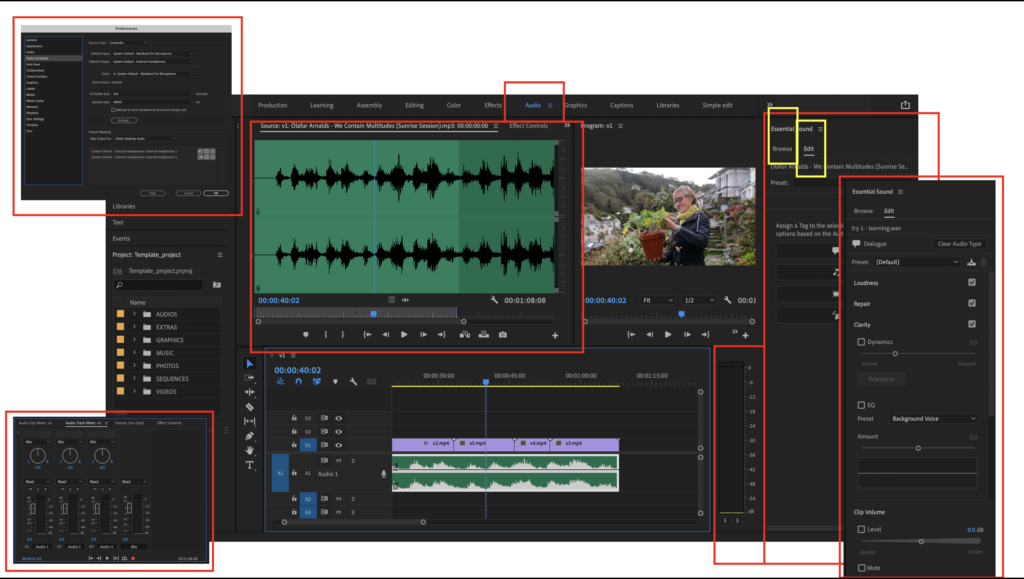
Audio features can be visualized in both the panel and in the timeline, this is to make audio editing more cohesive with video editing. In the Audio panel you can adjust the settings for the audio: go to preferences: audio. Let’s go over some of the functions of the main sound panel:
Essential Sound panel
This panel is the main panel of sound in Premiere; it is divided into two main sections:
- Examine: access to stock audios from Premiere, some might be creative commons, and some might be subjected to licenses (make sure to check). Sounds can be browsed by emotions (happy, sad, energetic, calm, etc) genres, and filters,
- Edit: in very simple ways this section allows us to tag different audio clips with different categories (dialogue, music, ambient, etc) and therefore add specific adjustments to behave in specific ways. This is useful for example to mix different audio tracks, let’s say music and dialogue, without having to manually set the parameters to ensure that one clip does not overtake the other.
Within editing sound, there are certain elements we can use to ‘fix’ common mistakes in clips, for example, loudness, repair, and clarity. It is possible to select presets from the Essential Sound panel or have manual control of each effect within the Effects Control panel.
Here is a great tutorial for audio repair and effects;
Text & animated graphs
Graphics
Adding graphics and text to the video has become easier within the program. There are a lot of templates (free and pro) that are available to use. Although some other platforms like Canva offer some animations that can be created within that program, it is worth learning how to create and use some of the offers in Premiere because we will have more control over the effects and configurations of the animation.
In the Panel Essential Graphics you will see two categories: Browse and Edit. Take some time to go over each. Might be useful for you to consider when editing, the types of graphics you might need for your videos:. Here are some examples of templates you can use:
- Intro template: animated title
- Descriptive texts: if introducing a person/character, you might need to describe who they are, for example in a testimonial/interview you can put a graph to show the name/role of the person presented
- Credits/Outro: text where you give credits to the people involved in the production of your video.
You can also create graphs from scratch: you do this by adding a Text layer on top of a clip. Similarly to Illustrator, layers work in an additive way so the order of the factors matter. Within the panel of Essential Graphics, there are several options to configure the shapes and text of the graphic created. As always, explore away! Here is an introduction tutorial to Essential Graphics:
Subtitles
Subtitles are important when thinking about the accessibility of our content. It is important to try to always have subtitles (translations or the same language) not only to make content accessible for diverse audiences but also to make our content more engaging. Remember! Most of the time we watch videos, especially on social media platforms without sound. So if your video does not have subtitles, audiences will most likely not be engaged right away!
Here is a super short tutorial on how to add subtitles super quickly!