Editing actions
Main actions in panel
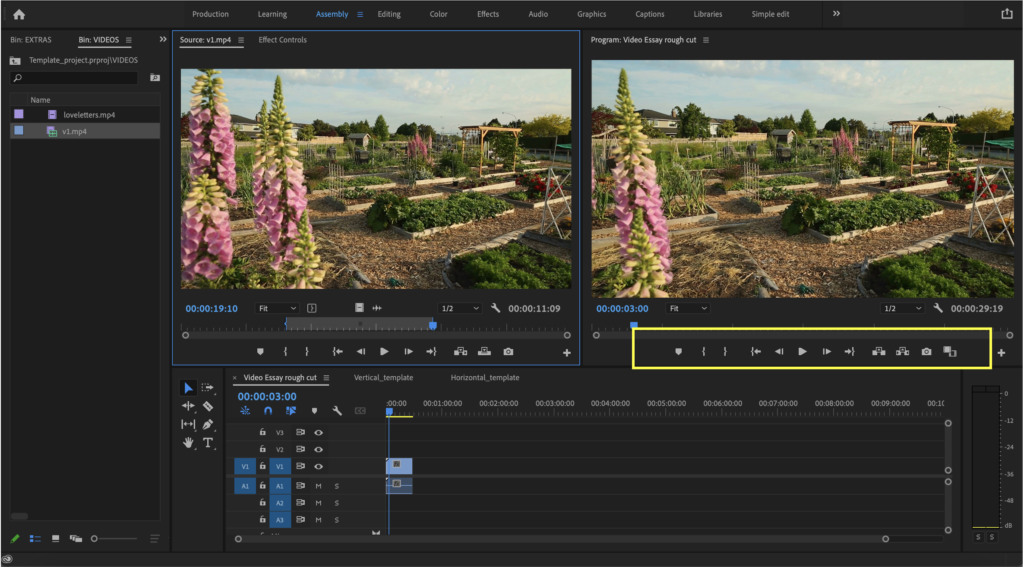
On the side of the PROGRAM MONITOR at the bottom of the panel, you will see a series of icons. They refer to the different actions we can have with a media file. From left to right they are:
- Mark: notes in different panels/moments of clips
- IN: start of the selection
- OUT: end of the selection
- Go back to IN
- Go back one frame
- Play
- Go forward one frame
- Go to OUT
- Lift: when IN-OUT is selected this option will delete everything that is selected and leave the empty space
- Extract: similar to lift but it will close the space the now-deleted file used to take.
- Export a frame
- Comparison view
Editing: basic tools
Using the timeline
The bar in yellow signals the timeline scope of vision: zoom in / zoom out, this bar can also be used to control where in the timeline are we.
Some shortcuts for moving around on this specific panel are:
- JKL (described before)
- Arrows (used to move between frames L/R and between clips (Up/Down)
- + / – = zoom in / zoom out
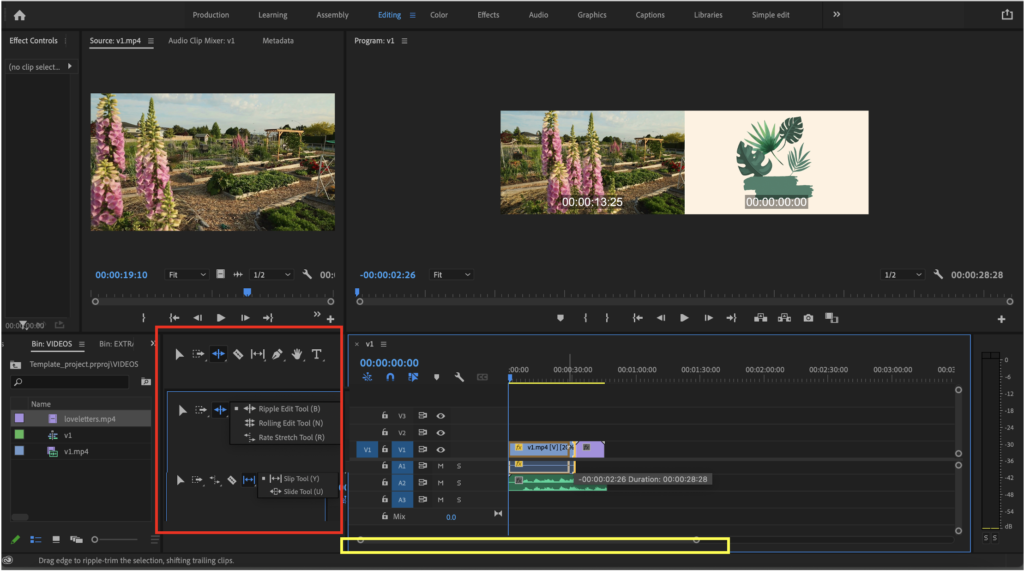
Basic editing actions
The red frame indicates the main editing actions that you apply to an asset. Learning what each one does can end up saving you a lot of time in editing. So take your time to explore and really understand when each tool is used. Here are a couple of pointers; from up to down the following icons are:
- SELECTION (V): this first tool is often used to edit because it can perform some of the actions like moving the beginning or the end of the clip, however using it as such will create a slow editing process. Incentivize participants to not use this as an editing tool. Using a sustained click will activate the lazo selection.
- TRACK SELECT: when having multiple clips this selection tool is useful; depending on the option selected (right/left) it will select ALL the clips to the right or left of the cursor.
- RIPPLE (BNR): (click longer to see the 3 options available) * with this tool a comparison view appears in the progress monitor panel: 1st option: shorten or lengthen a clip and adapt the other slips in the timeline to not leave any space. 2nd option: moves the point of intersection between two clips, this will edit both clips at the same time. This tool will allow you to edit 2 clips that are together to precisely and efficiently decide the moment you need them to stop/start. With this tool in the progress monitor panel, a comparison view will become active to show precisely the frames that are intersecting. 3rd option: rate stretch is to stretch the time/speed/duration of a clip. This does not cut the clip but modifies the speed at which the frames are shown.
- RAZOR (C): cut
- SLIP (YU): 1st option: this is a very useful but underestimated tool, when used on a clip it will move the original clip inside the allocated time the clip has in the timeline. 2nd option: it will move one clip without being affected and modify the next clips accordingly.
- PEN
- HAND
- TYPE
A quick tip is about markers!
You might not use them but markers (depending on the panel) are tiny notes that you can leave in specific moments either of the sequence or of particular files. They are useful when trying to synch audio together with video or to signal that you might want to come back to edit this specific section. Imagine them like super precise post-it notes!
Keyboard shortcuts
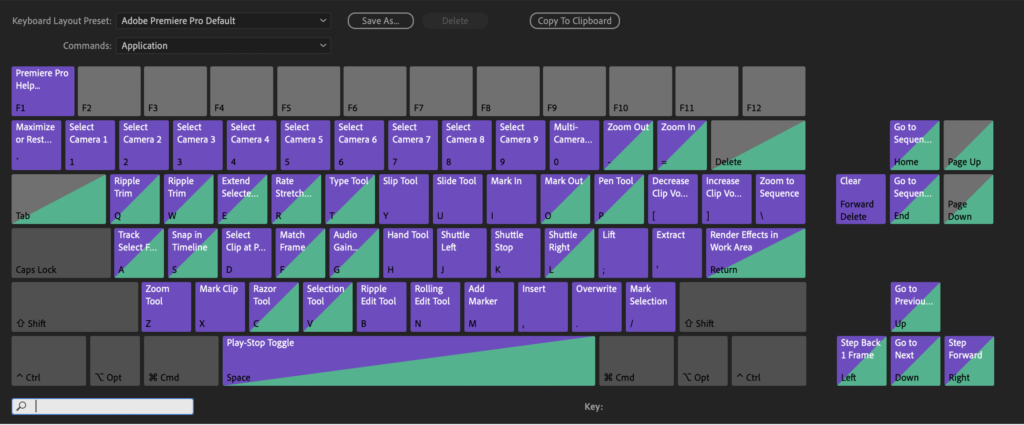
Trust us, this will be a great learning investment to make. Knowing all the shortcuts for editing within your keyboard will allow you to edit faster and make the process more intuitive and enjoyable! Here is an overview of the actions:
- V = selection
- C = cut/blade
- C + SHIFT = supercut (cuts all the elements in the timeline in the position selected)
- CTRL/OPT + C & CTRL/OP T+ V = copy & paste
- +/- = increase and decrease the work area (timeline)
- CTRL + S = save
- Y = slip tool (moves the moment of the video but not the position in the timeline)
- . = insert selection (when selecting a section from an original clip, not in the timeline, click on the timeline and click . to insert selection)
- ALT/OPT + drag = copy
- G = audio gain menu
- ENTER = render the project
- L = play forward (if clicked again, it goes faster: exponential)
- K = pause
- J = play backward (exponential)
- CTRL/COMMAND + ALT/OPT + K = keyboard settings
- CTRL/COMMAND + DELETE = clip is deleted, and timeline is adjusted accordingly
Some inspiration about editing
Take a look at this video, it is an interview about the movie “Everything, everywhere, all at once” where the core teams talk about a few simple, low-budget editing tricks they used for the movie. It’s great to see examples of this because often we think super complex editing techniques are needed in order to create great quality videos and this is an example of the opposite! We hope you enjoy it!